


In modern applications, security is paramount. Role-Based Access Control (RBAC) is a powerful way to manage access to resources by assigning roles to users. Coupled with JSON Web Token (JWT) authentication, RBAC becomes a seamless and secure method for protecting routes in your Node.js application.
1. What is Role-Based Access Control?
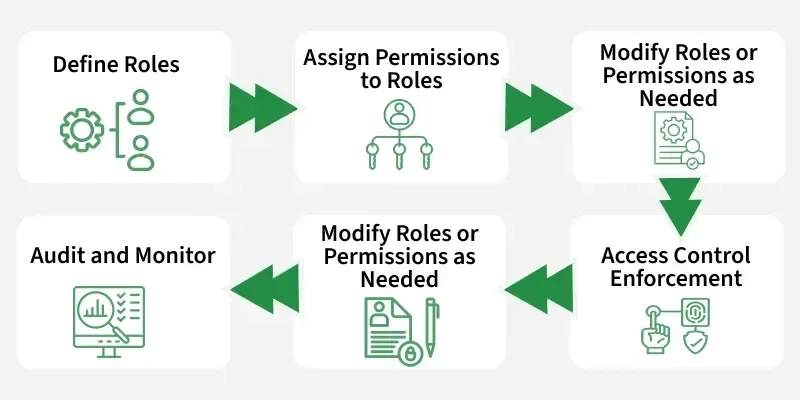
Role-Based Access Control (RBAC) restricts access based on users’ roles. For example:
- Admin: Can manage all resources.
- Editor: Can modify content but not delete it.
- Viewer: Can only view content.
RBAC ensures users can only perform actions permitted for their role, reducing security vulnerabilities.
Access Control & Security Model Comparison
| Feature / Dimension | Authentication (AuthN) | Role-Based Access Control (RBAC) | Attribute-Based Access Control (ABAC) |
| Core Question | “Who are you?” | “What group/role do you belong to?” | “What specific context/conditions apply?” |
| Primary Mechanism | Credentials, JWTs, Passkeys, OAuth | Predefined Roles (admin, editor) | Policies evaluated dynamically against user, resource, and environmental attributes |
| Granularity | Coarse (Identity verification only) | Medium (Broad categorical permissions) | Fine-grained (Context-aware, conditional) |
| Complexity to Implement | Low to Moderate | Low to Moderate | High |
| Best Used For | Verifying user identity at login | Standard SaaS dashboards, administrative portals, static user tiers | Complex multi-tenant systems, dynamic resource ownership, strict regulatory environments |
2. Why Use JWT for Authentication?
JWT (JSON Web Token) is a compact, URL-safe token for securely transmitting information between parties. JWT is widely used for its simplicity and stateless nature. It encodes user data and serves as a mechanism for authorization and authentication.
Read more blog : Front End Web Developer Interview Questions with Answers
3. Setting Up the Node.js Application
Start by setting up a basic Node.js application with express for handling routes and jsonwebtoken for JWT.
Step 1: Initialize the Project
        <pre data-line="">
            <code readonly="true">
                <xmp>mkdir rbac-nodejs
cd rbac-nodejs
npm init -y
npm install express jsonwebtoken bcryptjs body-parser dotenv
Step 2: Create Basic Structure
Your folder structure should look like this:
                    rbac-nodejs/
│
├── .env
├── server.js
├── routes/
│   ├── auth.js
│   └── user.js
└── middleware/
    ├── authenticate.js
    └── authorize.js
Step 3: Configure server.js
Create a simple server setup:
require("dotenv").config();
const express = require("express");
const bodyParser = require("body-parser");
const app = express();
app.use(bodyParser.json());
// Routes
app.use("/auth", require("./routes/auth"));
app.use("/user", require("./routes/user"));
const PORT = process.env.PORT || 3000;
app.listen(PORT, () => {
console.log(<code>Server running on http://localhost:${PORT}`);
});
</xmp>
</code>
</pre>
<h3><strong>4. Implementing JWT Authentication</strong></h3><p>JWT consists of three parts: Header, Payload, and Signature. Let’s implement login and token generation.</p><h4><strong>Create the auth.js Route</strong></h4>
<pre data-line="">
<code readonly="true">
<xmp>const express = require("express");
const jwt = require("jsonwebtoken");
const bcrypt = require("bcryptjs");
const router = express.Router();
const users = [
{
id: 1,
username: "admin",
password: bcrypt.hashSync("admin123", 10),
role: "admin",
},
{
id: 2,
username: "editor",
password: bcrypt.hashSync("editor123", 10),
role: "editor",
},
];
// Login Endpoint
router.post("/login", (req, res) => {
const { username, password } = req.body;
const user = users.find((u) => u.username === username);
if (!user || !bcrypt.compareSync(password, user.password)) {
return res.status(401).json({ message: "Invalid credentials" });
}
const token = jwt.sign({ id: user.id, role: user.role }, process.env.JWT_SECRET, { expiresIn: "1h" });
res.json({ token });
});
module.exports = router;
</xmp>
</code>
</pre>
<h3><strong>5. Adding RBAC to Your Application</strong></h3><h4><strong>Middleware for Authentication</strong></h4><p>Create <code>authenticate.js</code> to verify the JWT.</p>
<pre data-line="">
<code readonly="true">
<xmp>const jwt = require("jsonwebtoken");
function authenticate(req, res, next) {
const token = req.headers["authorization"];
if (!token) return res.status(403).json({ message: "No token provided" });
jwt.verify(token.split(" ")[1], process.env.JWT_SECRET, (err, decoded) => {
if (err) return res.status(401).json({ message: "Unauthorized" });
req.user = decoded;
next();
});
}
module.exports = authenticate;
</xmp>
</code>
</pre>
<h4><strong>Middleware for Authorization</strong></h4><p>Create <code>authorize.js</code> to restrict access based on roles.</p>
<pre data-line="">
<code readonly="true">
<xmp>function authorize(roles) {
return (req, res, next) => {
if (!roles.includes(req.user.role)) {
return res.status(403).json({ message: "Access forbidden" });
}
next();
};
}
module.exports = authorize;
</xmp>
</code>
</pre>
<h3><strong>6. Protecting Routes</strong></h3><h4><strong>Create the user.js Route</strong></h4><p>Add endpoints that use RBAC for access control.</p>
<pre data-line="">
<code readonly="true">
<xmp>const express = require("express");
const authenticate = require("../middleware/authenticate");
const authorize = require("../middleware/authorize");
const router = express.Router();
// Open to all authenticated users
router.get("/profile", authenticate, (req, res) => {
res.json({ message:</code>Welcome, user ${req.user.id}!`, role: req.user.role });
});
// Admin-only route
router.delete("/delete", authenticate, authorize(["admin"]), (req, res) => {
res.json({ message: "User deleted successfully!" });
});
// Editor and Admin route
router.post("/edit", authenticate, authorize(["editor", "admin"]), (req, res) => {
res.json({ message: "Content edited successfully!" });
});
module.exports = router;
7. Testing and Securing the App
- Generate a Token: Use the
/auth/loginendpoint to obtain a JWT by providing valid credentials. - Test Routes: Use a tool like Postman to access the endpoints with and without the token.
- Secure Your App:
- Use HTTPS in production.
- Store JWT secrets securely using
dotenvor a similar tool. - Implement token blacklisting if necessary.
Read more blog : AI Workflows You Can Build Without Coding
8. Conclusion
RBAC and JWT together provide a scalable and secure way to manage access in Node.js applications. With this setup, you can dynamically manage user roles and permissions, ensuring secure access to your application resources.
You may also like:
1) How do you optimize a website’s performance?
2) Change Your Programming Habits Before 2025: My Journey with 10 CHALLENGES
3) Senior-Level JavaScript Promise Interview Question
4) What is Database Indexing, and Why is It Important?
5) Can AI Transform the Trading Landscape?
Read more blogs from Here
Share your experiences in the comments, and let’s discuss how to tackle them!
Follow me on Linkedin
Frequently Ask Question:
1. What happens if a user’s role changes before their JWT expires?
Because JWTs are stateless, any role updates in the database won’t reflect in an active token until it expires and a new one is issued. To address this in production:
Keep access token lifespans short (e.g., 5–15 minutes) and pair them with a Refresh Token flow.
If instant revocation is mandatory, implement a Redis-based cache or blacklist to check whether a user’s permissions or session have changed.
2. Should sensitive user data be stored inside the JWT payload?
No. The payload of a standard JWT is only Base64URL-encoded, not encrypted. Anyone who intercepts or inspects the token can decode it to view its claims. Only store non-sensitive identifiers and authorization claims (e.g., userId, role, permissions). Never store passwords, API keys, or personally identifiable information (PII).
3. Where is the most secure place to store JWTs on the frontend?
HttpOnly, Secure Cookies (Recommended): Protects the token against Cross-Site Scripting (XSS) attacks because JavaScript cannot access the cookie. You must also implement Anti-CSRF measures (like SameSite cookie attributes or CSRF tokens).localStorage / sessionStorage: Easy to implement, but vulnerable to XSS attacks if malicious scripts run on the client side.
4. How does Role-Based Access Control (RBAC) differ from Attribute-Based Access Control (ABAC)?
RBAC assigns permissions directly to predefined roles (e.g., admin, editor, viewer). Access decisions depend solely on who the user is.
ABAC evaluates fine-grained attributes beyond roles, such as resource ownership (e.g., “an editor can only edit posts they created”), IP location, time of access, or device security state.
